

Monster Rancher 2 unlocking guide for all 38 breeds
An extensive guide covering unlocking conditions for all 38 breeds. 22 breeds are locked in the Playstation version. MR2DX's errantry + boss monsters bring the total up to 39 locked monsters!
Authorized IMa trainers
Chaille (from the shrine) gives this message when you have attempted to shrine a monster that is locked behind in-game events or accomplishments.this rare monster can be generated only by an authorized IMa trainer.
Please come again...
If you see this message, You have attempted to create a monster that is locked behind such an event. This guide explains each event to unlock a given monster.
Starting Monsters
From the Market
| Stable upgrade | Price | Breeder Rank |
|---|---|---|
| 1st | 15,000 | 4th |
| 2nd | 30,000 | 7th |
| Altar Upgrade | Price | Breeder Rank |
|---|---|---|
| 1st | 5,000 | not relevant |
| 2nd | 8,000 | not relevant |
| House Upgrade | Price | Breeder Rank | Inventory Slots |
|---|---|---|---|
| Start | - | - | 12 |
| 1st | 5,000 | 3rd | 14 |
| 2nd | 8,000 | 5th | 16 |
| 3rd | 12,000 | 6th | 18 |
| 4th | 20,000 | 8th | 20 |
| Breeder Rank | Beat Official |
|---|---|
| 10 | 4x M4 (S) |
| 9 | 3x M4 (S) |
| 8 | 2x M4 (S) |
| 7 | 1x M4 (S) |
| 6 | S |
| 5 | A |
| 4 | B |
| 3 | C |
| 2 | D |
| 1 | E |


Unlock Baku & Golem
Baku and Golem have the same requirements:
- Achieve Breeder Rank of 4 (You have beaten at least B Grade official with any monster).
- You have already purchased the first House upgrade from Binto.
- If you have 17,000 G or more on May 4th, Binto will arrive again and upgrade your stable for 15,000 G.
After this is done, Baku and Golem are unlocked.
Unlock Bajarl
- Achieve Breeder Rank of 8 (Beat two of the Major 4 with any monster).
- You have already purchased the first three house upgrades and two stable upgrades from Binto.
- If you have 22,000 G on May 4th, Binto will arrive again and upgrade the house for the final fourth time.
- After this is done, you will be given the Magic Pot
- Combine any two monsters with the Magic Pot to unlock/make a Bajarl.


Unlock Beaclon
Unlock the Worm.
After, Raise a Worm with any sub-breed (including ???) while satisfying all of the following conditions:
- The Worm’s rank is C, or lower.
- The Worm is at least 4 years old, and less than 5.
- The Worm’s loyalty is 80 or more.
- The Worm must have been fed 30 or more "Cup Jelly."
- The Worm has 0 fatigue and 7 or less stress on June 4th (Resting on the 3rd required)
If all conditions are satisfied, the Worm will cocoon into a Beaclon with a 100% chance. If the Worm cocoons into a different monster, not enough "Cup Jelly" were fed to it. With the conditions satisfied, it will cocoon into, and unlock the Beaclon, which will live out the rest of the Worm’s lifespan.
A successfully cocooned worm (Beaclon or alternate breeds below) will retain the original worm's current stats, Stat Gains, Guts rate, remaining lifespan, etc. It is essentially a reskinned worm with the cocooned breed's skin and techs. If you want a "true" Beaclon you will need to combine for one, or generate one at the Shrine.
Unlock Centaur
- Achieve Breeder Rank of 4 (You have beaten at least B Grade official with any monster).
- You have finished the first expedition Phoenix Volcano Adventure at Kawrea.
- Send a monster that is B Grade or higher to the Heavy Errantry (Mandy Desert) between the months of March and August. If the monster is uninjured, it will return with a Spear. Your monster and the Centaur will fight (this will take an entire week so you will lose additional lifespan).
There is no particular penalty for losing this fight- but it is not difficult. - Combine any two monsters with the Spear in to unlock/make a Centaur.

Unlock Dragon
- Achieve Breeder Rank of 6 (You have beaten S Grade official with any monster).
- Have Binto renovate your stable at least once.
- You have participated in at least one IMa vs. FIMBA meet.
- Having done all of the above, have a B Grade monster exactly (not higher or lower) on the ranch on July 1st, you will be invited to the Dragon Invitational.
- Attend the Dragon Invitational on August 2nd and defeat Lagirus to receive the Dragon’s Tusk.
- Combine any two monsters with the Dragon Tusk to unlock/make a Dragon (You may attend this match multiple times to receive more tusks for selling or as a combining item).

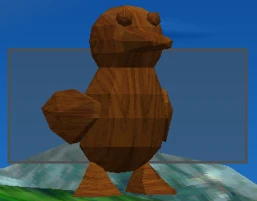
Unlock Ducken
- You have finished the first expedition Phoenix Volcano Adventure at Kawrea.
- A thing of note: Both "Quack Doll" items mentioned here have the same name in-game. This is not a typo on the guide, they are "different" items.
- Feed your monster enough "Cup Jelly" to receive 5 "Diamond Marks*", and receive the poorly assembled Quack Doll (looks slightly in pieces) that comes as a reward (You can either sell this doll or give it to your monster).
- Afterwards, attend the Torles expedition with Rovest (Requires a C Grade or higher monster with 210+ LIF, 50+ Fame). Retrieve the Strong Glue from the tree near the beginning of the expedition.
If your monster has less than 350 INT, the Strong Glue will NOT appear. - With the Strong Glue in inventory, create a second Quack Doll via 5 Cup Jelly Diamond Marks and it will become a Quack Doll that looks well assembled.
- Combine any two monsters with the fully assembled Quack Doll to unlock/make a Ducken.
*You can soft reset/save scum for Diamond Marks
You cannot get rid of the Strong Glue without cheating/using a cheat device such as a Gameshark to remove the item from inventory
Fixed in DX, Once Ducken is unlocked in fusion, you are allowed to sell the Strong Glue. Even after selling the glue you will continue to create the "Glued" version of the Quack Dolls.
This is not the Combining Item
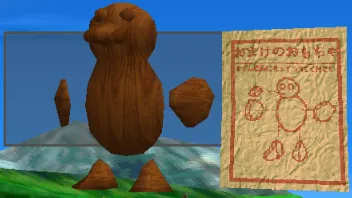
This IS the Combining Item
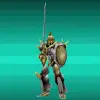
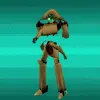
Unlock Durahan
- You have finished the first expedition Phoenix Volcano Adventure at Kawrea.
- Attend the Parepare expedition with Kavaro (Requires a C Grade or higher monster with 140+ LIF, 40+ Fame). Visit the Decaying Palace behind the huge pumpkin, and search for and find the Old Sheath.
If your monster has less than 300 INT, the Old Sheath will NOT appear. - Go to the Shop to hear Aunt Verde’s rumor.
- From there, any monster must be exactly A Grade, and it will be invited to the Double-Edged Invitational on February 1st (to fight in an A Grade match on February 4th) to Win the Double-Edged Sword.
- Combine any two monsters with the Double-Edged Sword to unlock/make a Durahan.
* The act of finding the Old Sheath triggers the conversation with Auntie Verde at the item shop. You don't need to have Old Sheath in your inventory, and it can even be discarded after you found it on expedition.
This is not the Combining Item
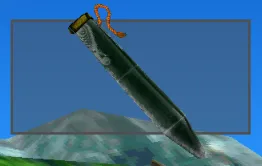
This IS the Combining Item


Unlock Gali, Henger, Mew, Worm
Gali, Henger, Mew, Worm have the same requirements:
- Achieve Breeder Rank of 1 (You have beaten at least E Grade official with any monster).
- With a D Grade or higher monster on the ranch on July 1st, you’ll be invited to the IMa vs. FIMBA Elimination qualifying match on July 4.
- Win the qualifying match and you can attend the IMa - FIMBA Meet on August 4th.
- Attend, and whether your team wins or loses the meet, you will unlock all four breeds afterwards.
- This tournament only occurs once every 4 years! You will only receive a July Week 1 invitation the first time, afterwards, this tournament silently appears every 4 years from your first invite on July wk 4 ; Only visible if your monster is D+ Grade.
- The participating monster in the August IMa - FIMBA Meet MUST be the same monster that wins the Elimination tournament in July.
- If your monster dies immediately after the tournament, the dialogue about unlocking the monsters will occur after you get a new monster on the ranch and allow a week to pass.

Unlock Ghost
- Allow a monster to die. Hold a funeral and build a shrine for it.
- 140 weeks later, if you have at least 8,000 G on March 3rd, you will be prompted to upgrade the shrine for 5,000 G. Upgrade the Shrine.
- Another 140 weeks later, a similar event will occur on March 3rd if you have at least 13,000 G. Upgrade the Shrine for the second and final time for 8,000 G.
- The following year on March 3rd, you will have a brief cut-scene and then receive the Stick.
- Combine any two monsters with the Stick to unlock/make a Ghost.


Unlock Jill
- Achieve Breeder Rank 6 (You have beaten S Grade official with any monster).
- You have finished the first expedition Phoenix Volcano Adventure at Kawrea.
- Attend the Torles expedition with Rovest (Requires a C Grade or higher monster with 210+ LIF, 50+ Fame), and acquire the Big Footstep from the Large Snowman at the top right of the map.
If your monster has less than 500 INT, the Footstep will NOT appear. - Afterwards, send a B or higher rank monster to the Sharp Errantry (Papas Mountains). You will be warned about "Bighand."
- Defeat Bighand during the errantry to receive the Big Boots
- Combine any two monsters with the Big Boots to unlock/make a Jill.
(Finding the Big Footstep itself has no rank requirement but the rest does)
* The act of finding the Big Footstep flags the game to allow the Bighand encounter when meeting the requirement. You don't need to have Big Footstep in your inventory, and it can even be discarded after you found it on expedition.
This is not the Combining Item

This IS the Combining Item


Unlock Joker
- You have finished the first expedition Phoenix Volcano Adventure at Kawrea.
- Attend the 2nd Kawrea Expedition (Requires a B Grade or higher monster with 280+ LIF, 50+ Fame) and Visit the Burnt Altar on the upper right side of the map and find the Joker Mask.
If your monster has less than 300 SKI, the Mask will NOT appear. - Head back to the ranch- sit through Pab’s idiocy, and then receive the Joker Mask
- Combine any two monsters with the Joker Mask to unlock/make a Joker.


Unlock Metalner
- Achieve Breeder Rank 8 (Beat two of the Major 4 with any monster).
- The year is at least 1010
- You have a B or higher rank monster on the ranch
- With the above conditions satisfied, on September 1st you’ll be visited by "Aliens." This can continue to happen through November 4th or until the event is finished.
(it is not guaranteed to occur the first time, as it is weather dependent- which is random) - Once concluded, you will receive a crystal and be trash talked.
- Take this Crystal to the Shrine in town to unlock the Metalner (no combination item).
Not used in fusion/Take to Shrine


Unlock Mock
- Phoenix and Metalner cannot trigger this event.
- You have already visited the shop at least once.
- There's not a Shop sale active this week (through Trainer Promotion sale or Discount Sale in the mail).
- It's not a week that a new item is being introduced into the shop.
- Magic Banana is currently available at the shop.
- Achieve Breeder Rank 4 (You have beaten at least B Grade official with any monster).
- With the above conditions met, visit the Shop on occasion until you receive the Seeds, which will be planted on your ranch.
- 1999 version/NTSC: This event is tied to "new unlocked item countdown timer" being greater than 0. If you unlock "Manseitan" and an additional 200 weeks pass before reaching Trainer Rank 4, then the timer will remain at 0; therefore, locking you out of being able to get Mock forever. Though, this takes almost 30 game years to occur.
- DX: This is fixed: you can't be locked out of acquiring Mock anymore.
- Allow 576 weeks to pass (12 years) after planting the tree
- Several brief events and dialogue will occur over the years in regards to the planted tree (It sprouts, grows, blooms, possibly buds the flower, moves).
- The next April Week 1 after the 576 weeks have passed, the tree will appear to have died.
- Allow any monster to die on the ranch (funeral not required).
- Afterwards, you will receive a free Mock which appears in your Stable, and Mock will be unlocked.
* If both Mock and Wracky are ready to be unlocked after the death of a monster, the game will prioritize Mock first.


Unlock Niton & Undine
Niton and Undine have the same requirements:
- Achieve Breeder Rank 4 (You have beaten at least B Grade official with any monster).
- Raise a Hopper with any sub-breed to at least B Grade, and have it on the ranch during the Winter months (December to February).
- Ensure that the Hopper has 0 fatigue and less than 30 stress at the start of a week (resting is mandatory).
- It will dig up Hot Springs and you'll have a scene with Pabs. Afterwards you will receive the Undine Slate.
- Niton: When the Hot Springs cutscene is over, the Niton is quietly unlocked (no combination item or notice is given, it will simply be available at the Shrine now).
- Undine: Combine any two monsters with the Undine Slate to unlock/make an Undine.


Unlock Phoenix
- Achieve Breeder Rank 1 (Have beaten E Grade official with any monster).
- There are 2 different expedition maps (Both in Kawrea) that the Fire Feather can be acquired from.
Option 1: One time opportunity during the "Training" expedition.
- Monster must have 140+ LIF, 40+ Fame and is D Grade or higher.
- Attend the Phoenix Volcano Adventure at Kawrea.
- Acquire the Fire Feather from the only searchable location at the center of the map.
- Save prior to the 1st expedition and reset until you get the Fire Feather.
Option 2: All Future visits to Kawrea Expedition will be "Kawrea Volcano Adventure" with higher requirements.
- Monster must have 280+ LIF, 50+ Fame and is B Grade or higher.
- Attend the Kawrea Volcano Adventure
- Acquire the Fire Feather from the Phoenix Statue or Magma Tower locations during the regular and future expeditions to Kawrea.


Unlock Wracky
- Phoenix and Metalner cannot trigger this event.
- Achieve Breeder Rank 7 (Beat one of the Major 4 with any monster).
- The year is 1005 or higher.
- When you have a monster with 90+ Fame on the ranch, you will receive the Doll. Regardless of your chosen options, you will always receive the doll.
- Colt will ask to throw it away the next week. (It doesn’t matter what choice you pick, If you Throw it away, it will continue to get delivered 3 times over 3 months until Colt decides to keep it).
- After the doll is kept, and after Colt asks you if you moved the doll, allow a monster to die.
- Afterwards, you will receive a free Wracky which appears in your Stable, and Wracky will be unlocked.
* If both Mock and Wracky are ready to be unlocked after the death of a monster, the game will prioritize Mock first.

Unlock Zilla
- Achieve Breeder Rank 6 (You have beaten S Grade official with any monster).
- You have upgraded the stable at least once
- You have completed the requirements to unlock the Niton and Undine.
- With the above met, Send a B Grade or higher monster to the Hit Errantry (Torble Sea), you will be warned about a big water creature.
- Complete the Errantry and defeat the random encounter "Zilla King" to receive a "Zilla Beard"
Like with Bighand, whether or not Zilla King will appear or not at the end of the errantry is random. - Combine any two monsters with the Zilla Beard to unlock/make a Zilla.

- After their unique death animations of flying away, you return to Town instead of back on the ranch where the event would normally occur with a vacant stable.
- Because you're in Town, this means you cannot go back to the ranch without another monster from the Market, Shrine, or Lab. As such, the stable won't be empty and the event is not triggered.
- Neither Phoenix or Metalner return from the dead, or come back after flying away. This is a debunked myth.
Any person or website reporting this information as truth has copied it from an old post from the 1999 or 2000s where in March 2000, the author that previously published that it was possible had admitted they completely made it up.
- Combine a Silver Suezo and a Bronze Suezo to acquire a Gold Suezo.
Gold Suezo is the only rare monster in the 1999 NTSC version of the game can naturally be acquired through combining. (This does not count DNA capsules for those rares, which are normally only available in the JP version but can be cheated into the game)
In MR2DX this is no longer necessary.
There are over 1,615 Title/Artist entries that can create one of the 3 variants of Gold Suezo directly at the Shrine, however you can still do the original process to create a Gold Suezo.
- Unlock and raise a Doodle in MR1, then freeze it.
- In MR2, at the Shrine, use the Slate option instead of the Disc Stone option
- Point towards your MR1 save file with your frozen Doodle to shrine a Scribble in MR2
In MR2DX this is no longer necessary
There are 1,126 Title/Artist entries that can create one of the 2 variants of Scribble directly at the shrine, however you can still do the original process to slate a Scribble.
Using Less than 30, or no Cup Jelly at all, but meeting all other Beaclon requirements will result in one of the Non-Beaclon breeds below.
Whatever Tech the worm has prior to cocooning, will be come the tech on the same row, for the Breed/Column it cocoons into.
(Beaclon is included in the table to reference which Techs of Worm become which techs for Beaclon).
| WORM's Techs | After Cocooning: New Breed's Techs |
||||
| Prior to Cocooning | Beaclon (Beaclon/Beaclon) | Night Flyer (Pixie/Worm) | Wild Hare (Hare/Worm) | Brown Mask (Gali/Worm) | |
| Bite, Sting (Basic) | Punch, Horn Strike (Basic) | Pat, Slap (Basic) | One-Two Punch, Gas (Basic) | Straight, Thunderbolt (Basic) | |
| Pierce (Withering) | Tremor (Withering) | Kiss (Withering) | Foul Gas (Withering) | Typhoon (Heavy) | |
| Poison Gas (Withering) | Tremor (Withering) | Heel Raid (Heavy) | Bang (Special) | Smash Thwack (Heavy) | |
| Tusk Slash (Sharp) | Horn Combo (Sharp) | Ray (Sharp) | High Kick (Sharp) | Flying Mask (Sharp) | |
| Injection (Sharp) | Horn Cannon (Sharp) | Megaray (Sharp) | Spin Kick (Sharp) | Cutting Mask (Sharp) | |
| Pierce-Throw (Heavy) | Dive Assault (Heavy) | Flame (Heavy) | Back Blow (Heavy) | Thwack (Heavy) | |
| Pinch-Throw (Heavy) | Flying Press (Heavy) | Heel Raid (Heavy) | Rolling Blow (Heavy) | Whirlwind (Heavy) | |
| Somersault (Hit) | Heavy Punch (Basic) | Bolt (Hit) | Straight (Hit) | Back Blow (Hit) | |
| Somersaults (Hit) | Maximal Punch (Basic) | Lightning (Hit) | Hard Straight (Hit) | Fire Wall (Hit) | |
| Tail Lash (Hit) | Horn Attack (Basic) | Kick (Basic) | Kung-Fu Fist (Sharp) | Blaze Wall (Hit) | |
| Two Lashes (Hit) | Top Assault (Hit) | High Kick (Basic) | Kung-Fu Blow (Sharp) | Heavy Blow (Hit) | |
| Three Lashes (Special) | Punch Combo (Special) | Bang (Special) | Smash (Heavy) | Spirit Blow (Special) | |
| Roll Assault (Special) | Beaclon Combo (Special) | Big Bang (Special) | Heavy Smash (Heavy) | Hurricane (Special) | |
| Wheel Attack (Special) | Frantic Horn (Special) | -Nothing- | Big Bang (Special) | Giant Blow (Special) | |
| WORM's Techs | After Cocooning: New Breed's Techs | ||||
| Prior to Cocooning | Fly Eye (Suezo/Worm) | Worm Jell (Jell/Worm) | Soboros (Monol/Worm) | Earth Keeper (Naga/Worm) | |
| Bite, Sting (Basic) | Tail Assault, Spit (Basic) | Stab, Pierce (Basic) | Charge, Flattening (Basic) | Thwack, Belly Punch (Basic) | |
| Pierce (Withering) | Kiss (Withering) | Fly Swatter (Withering) | Scratch (Withering) | Energy Shot (Sharp) | |
| Poison Gas (Withering) | Lick (Withering) | Slingshot (Withering) | Double Beams (Sharp) | Poison Gas (Withering) | |
| Tusk Slash (Sharp) | Telepathy (Sharp) | Beam Gun (Sharp) | Strange Light (Sharp) | Energy Shot (Sharp) | |
| Injection (Sharp) | Eye Beam (Sharp) | Beam Cannon (Sharp) | Beam (Sharp) | Energy Shots (Sharp) | |
| Pierce-Throw (Heavy) | Bite (Heavy) | Jell Cube (Heavy) | Needle Stabs (Heavy) | Tail Assault (Heavy) | |
| Pinch-Throw (Heavy) | Tongue Slap (Heavy) | Cannon (Heavy) | Spike Stabs (Heavy) | Drill Attack (Heavy) | |
| Somersault (Hit) | Teleport (Hit) | Whip (Basic) | Screech (Hit) | Stab (Hit) | |
| Somersaults (Hit) | Telekinesis (Hit) | Two Whips (Basic) | Flattening-X (Basic) | -Nothing- | |
| Tail Lash (Hit) | Teleport (Hit) | Jell Press (Hit) | Flattening-L (Basic) | Pierce (Hit) | |
| Two Lashes (Hit) | Telekinesis (Hit) | Jell Top (Hit) | Sound Wave (Hit) | -Nothing- | |
| Three Lashes (Special) | Chewing (Special) | Three Cubes (Heavy) | Knock (Special) | Tail Assault (Heavy) | |
| Roll Assault (Special) | Chewing (Special) | Fly Smasher (Withering) | Three Knocks (Special) | Turn Assault (Special) | |
| Wheel Attack (Special) | Yodel (Special) | Gatling Gun (Special) | Two Knocks (Special) | Drill Attack (Heavy) | |
- # of Uses of a worm's tech are not inherited to the corresponding tech of the cocooned monster.
- NightFlyer does not start with Kick
- Worm Jell does not start with Whip
- The guts regeneration and arena movement speed of the original worm are retained after changing.
- This can be used in the case of the Gali, Monol, and Hare to create a monster with higher arena movement speed and/or guts regeneration than could be created by any other means via cocooning a Worm/Pixie or Worm/Plant. Some tech chains like Needle Stabs -> Spike Stabs can also be skipped by this.
- Upon cocooning, the following stats will be gained:
New Monster Main Cocoon Bonus Beaclon Beaclon +30 LIF Wild Hare Hare +30 POW Brown Mask Gali +30 Base Nature Fly Eye Suezo +30 INT Night Flyer Pixie +30 INT Earth Keeper Naga +30 SKI Worm Jell Jell +30 SPD Soboros Monol +30 DEF - Due to rank requirements, the techs converted from Roll Assault aren't accessible without a special Worm.
- Three Lashes is only accessible on a Worm specific to the MR DX port.
- Wheel Attack's conversion currently is a datamining only result.
- In MR2DX, once unlocked, you can generate Boss and Errantry monsters at the Shrine.
- Enemy and Bosses are locked until you encounter them, even if you have the main breed unlocked,
- In the PSX/original game only their Cards are unlocked after you encounter them.
TOURNAMENT : Unlockable Encounters
Boss Monsters are unlocked in the Legend Cup tournament after you've beaten the M4 tournaments. See Calendar for Invite and Tourney dates. You cannot unlock both Most & Poritoka with the same monster. You must use a different monster for each one!(White Mocchi)
(White Suezo)
ERRANTRY : Unlockable Encounters
All of the S & A class enemy bosses (the /??? Rares) require at least a B Grade monster or higher. Some have additional exceptions or requirements, listed below.
Encounter Conditions & Chances:
Additions to requiring a B grade or higher monster.- [1] Bighand can be encountered after Jill unlock pre-requisite conditions are met. "Bighand" will be unlocked as soon as the main breed Jill is unlocked after using the fusion item that is won from the encounter.
- [2] Requires Centaur to be unlocked before it can be encountered. Once encountered it is unlocked.
- [3] 1999/Original version: King Ape can only be encountered while Magic Bananas are the most recent Shop item. Fixed in DX; You can encounter forever. Once encountered it is unlocked.
- [4] Zilla King can be encountered after Zilla unlock pre-requisite conditions are met. "Zilla King" will be unlocked as soon as the main breed Zilla is unlocked after using the fusion item that is won from the encounter.
- [5] Blue Phoenix can be encountered if Phoenix is unlocked, and the Year is 1010 or higher. Once encountered it is unlocked.
| Enemy Rank | S contition is met | S contition is NOT met |
|---|---|---|
| S Encounter chance | 20% | 0% |
| A Encounter chance | 8.9% | 11.1% |
| A Encounter chance | 8.9% | 11.1% |
This information has been updated for DX. Additional clarification are made periodically.
Credits: MRM original contributors, and Alchius' consolidated info, Lexichu, SmilingFaces96